Images are pretty easy to create and compose, but in order to display them we need something a bit more complicated. To see the image(s) you create, we provide a method that pops up a window to display an image (Scene).
Simple Images/Scenes
To display images within FunJava we create an examples class that creates a Scene and displays it from within a test method. Here's a simple example, Examples1, that uses Circle, Square, and OverlayXY to create a Scene. The Scene is then displayed in the testDisplay method.
      import image.*;
      import world.*;
      import tester.*;

      class Examples1{
          Examples1(){}

          Scene mt = new EmptyScene(100, 100);
          Image circ = new Circle(20, "outline", "blue");
          Image sqr = new Square(40, "solid", "palegreen");
          Scene scn = mt.placeImage(new OverlayXY(circ, -20, 20, sqr), 50, 50);

          boolean testDisplay(Tester t){
              return World.display(scn);
          }
      }
Running this example (using FunJava) results in a
window similar to the following: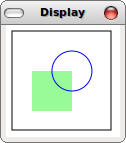
The testDisplay method is called by the FunJava library. Our test method calls World.display to show the constructed image (this.scn). World.display returns a true once the popup window is closed.
Natural-Number Recursion
Of course, we're not limited to hand constructed Scenes since we know how to use recursion over the natural numbers. Examples2 implements a recursive method, stars, that builds a Scene. Our base-case returns the EmptyScene, and our recursive case places (placeImage) a Star of the given size in the Scene returned by the recursive call.
      class Examples2{
          Examples2(){}

          // Create a Scene with nested stars of decreasing size
          Scene stars(int size){
              if(size <= 4){
                  return new EmptyScene(200, 200);
              }else{
                  return this.stars(size-15)
                      .placeImage(new Star(size, "outline", "red"), 100, 100);
              }
          }

          boolean testDisplay(Tester t){
              return World.display(this.stars(100));
          }
      }
We start with a size of 100,
and display the result. Running this example results
in a window similar to the following: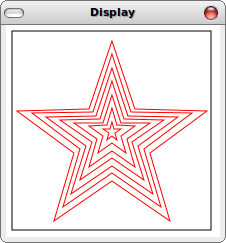
Structural Recursion
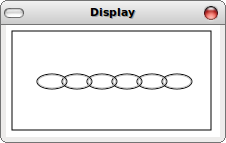
As you remember (hopefully), natural-number recursion is just a special case of structural recursion (which in turn is a special case of what HtDP calls generative recursion).As an example of a recursive structure, below we define an interface and classes that together represent a chain of arbitrary length. Link and End implement IChain, which contains a single method header. What's important for this example is that we can place an image of an IChain into a given Scene.
      // Represents a Chain
      interface IChain{
          // Place this IChain into the given Scene
          Scene place(int x, Scene scn);
      }
      // Represents a Link in a Chain
      class Link implements IChain{
          IChain next;

          Link(IChain next){
              this.next = next;
          }

          // Place this Link into the given Scene
          Scene place(int x, Scene scn){
              return this.next.place(x+25, scn)
                  .placeImage(new Overlay(new Ellipse(28, 13, "outline", "gray"),
                                          new Ellipse(30, 15, "outline", "black")),
                              x, 50);
          }
      }
      // Represents the end of a Chain
      class End implements IChain{
          End(){}

          // The end of the chain, return the Scene
          Scene place(int x, Scene scn){
              return scn;
          }
      }
Each of the classes implements the method, Scene place(int, Scene), which returns the appropriate scene. For the End of the IChain we simply return the given Scene. For a Link we place an Ellipse in the Scene returned by the recursive call on the next IChain.
Now all we need to do is create an examples class that creates an IChain instance and has a test method that displays the IChain after placing it into the EmptyScene.
      class Examples3{
          Examples3(){}

          Scene mt = new EmptyScene(200, 100);
          IChain ch = new Link(new Link(new Link(
                         new Link(new Link(new Link(new End()))))));

          boolean testDisplay(Tester t){
              return World.display(this.ch.place(40, mt));
          }
      }
Running this example results in a window similar to the
following: