Simple Line Drawing
Description of the Simple Line Drawing program
JPT Techniques
Creating and using the ColorView
Creating and using the TextAreaView
Creating and using the BufferedPanel with graphics
Installing GUI Components Part 2
In this program we introduce the BufferedPanel, the ColorView and the TextAreaView.
The BufferedPanel is used to display graphics. The ColorView allows the user to select the color of the line before it is drawn. The TextAreaView is used to display the history: the coordinates of the lines already drawn.
Description of the Simple Line Drawing program
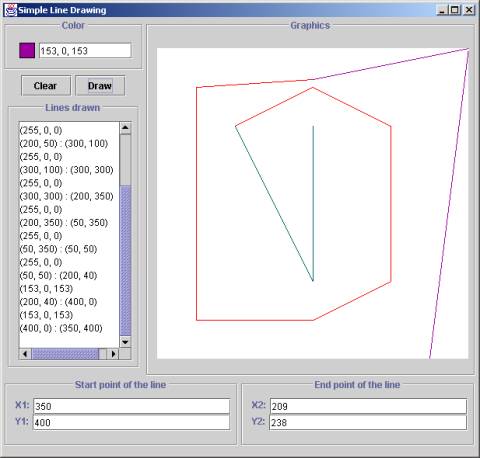
We build a simple program that will let the user make a simple line drawing (possibly dot-to-dot) and select the color of the lines. Two snapshots of the view of the entire GUI are shown below.
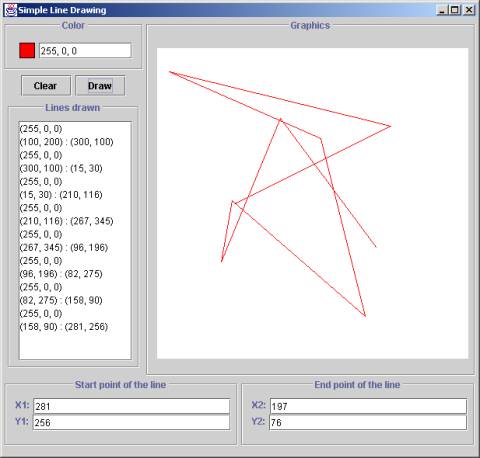
The two snapshots illustrate the fact that the history panel automatically adds scrollbars, once it runs out of space to hold all information needed. In the first snapshot the line endpoints were chosen at random by the program. In the second snapshot the user selected the endpoints and also selected new color for some of the lines.
View
This program uses two pairs of TextFieldViews to allow the user to select two sets of endpoints for a line. The ColorView allows the user to select color of the line before it is drawn. The TextAreaView is used to display the history: the coordinates of the lines already drawn. The graphics is displayed in a BufferedPanel.
Model
The internal data model consists of two Point2D.Double objects that represent the two endpoints of the line. These two objects are instantiated every time the draw action is selected. The line is drawn, the history is recorded, the TextFieldViews are set to new values, and the objects die as the action method exits. This represents the Model part of the program.
Actions
The program uses one ActionsPanel with two associated Actions. The clear Action clears the history, the graphics window, and resets the four TextFieldViews to the original default values used in the constructor. The draw Action extracts the coordinates for the endpoints of a line from the TextFieldViews, extracts the color from the ColorView, sets the color, draws the lines, and performs several view update operations. It records the current line in the history, makes the current endpoint a suggested start point for the next line, and selects a random point to be the suggested next endpoint. This represents the Action part of the program.
GUI
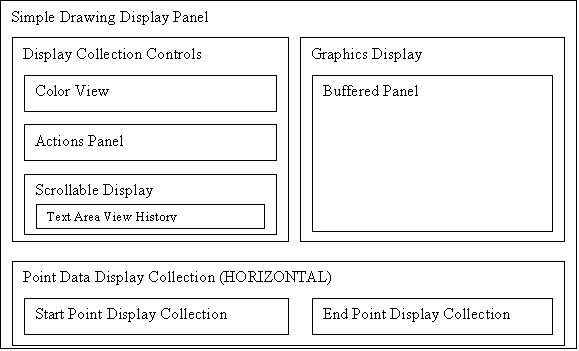
The GUI is enclosed in a QuickJPTFrame titled Simple Line Drawing. The SimpleDrawing class extends the DisplayPanel class and uses a BorderLayout to organize its appearance. Each pair of TextFieldViews that represent the endpoints of a line is installed in a titled DisplayCollection. Together, these two displays are installed in a DisplayCollection with horizontal alignment. The TextAreaView that holds the history is installed in a ScrollableDisplay to make sure we can see all of the line coordinates as needed. The ColorView, the actions panel, and the TextAreaView, are combined in a DisplayCollection controls. The BufferedPanel is installed in a Display titled Graphics. Finally, the DisplayCollection controls, the DisplayCollection that holds the TextFieldViews. and the Graphics Display are installed in the proper locations in the SimpleDrawing DisplayPanel.
The diagram shows how the components fit together - omitting the lowest level text field views:
JPT Techniques
Creating and using the ColorView
The ColorView is used to display a selected color and allows the user to select a color for the graphics either through the use of the JColorChooser dialog, or by typing in the RGB values in the associated text field view. It is a JPT component that implements the Displayable interface. The programmer may choose to create a simple color view that contains only a color swatch or to instantiate the full color view that includes a color swatch and a corresponding text field view. The color text field view displays the RGB values for the currently selected color formatted as comma-separated integers. The user may change the selected color by typing the changes into the text field and hitting the RETURN key. Full scale parsing and the corresponding error strategy for the text field view will be activated. The suggestion for the error strategy will be set to the initial default color selected by the user in the constructor. The programmer may also select the number of clicks needed by the user to activate the JColorChooser dialog.
Additionally, the color text field view allows for specifying the color in the RGB-Alpha format, where the fourth integer defines the saturation level for the color. An example of its use can be found in the Circle Deluxe sample program and tutorial.
The ColorView is defined in the following statement:
// color view where user can select the color for the drawing
private ColorView color =
new ColorView(Color.red, true); // initial color is red
// include color text field view
In the constructor for the GUI we select the click count that activates the color chooser:
// activate color chooser using single click
color.setChooserClickCount(1);
Also in the constructor, we add the color view to the GUI, installing it as a wrapped titled display into the controls display collection:
// add color view to controls
controls.add(
new DisplayWrapper(
new Display(color, null, "Color")));
The current color selection can be extracted from the color view in several ways. The getColor and setColor methods use the Java Color class. The demandObject and requestObject methods call the getColor method and return an XColor object. The getViewState method first calls demandObject and then it converts the XColor it extracted to a String using the toStringData method in the XColor class. We extract the color from the color view inside the draw action in the following manner:
// set paint color to user color choice
G.setPaint(color.getColor());
where G is the graphics context for the BufferedPanel.
We also display the view state of the color view in the history panel as a comma-separated string using the getViewState method as follows:
// show the color and the line coordinates for history
history.append("(" + color.getViewState() + ")\n");
...
Creating and using the TextAreaView
A TextAreaView is a JPT component that implements the Displayable interface and can display several lines of text. If it is installed in a ScrollableDisplay, the scroll bars will automatically appear when needed. The entire contents of the TextAreaView can be extracted with a single getViewState method call that returns an XString object. The TextAreaView extends the Java Swing JTextArea class and so we can call the append method of JTextArea to add text to the TextAreaView.
We defined a TextAreaView object as follows:
// panel to display past graphed points
private TextAreaView history = new TextAreaView();
We set its size using the following two methods in the JTextArea class:
// set preferred size for the history text area
history.setColumns(13);
history.setRows(18);
The TextAreaView is installed in a ScrollableDisplay as follows:
// install history panel in a scrollable display
// add to controls wrapped with a title
controls.add(new DisplayWrapper(new Display(
new ScrollableDisplay(history), // installed as scrollable
null, // no annotation
"Lines drawn"))); // title for the display
Finally, we add text to the TextAreaView as follows:
// show the color and the line coordinates for history
history.append("(" + color.getViewState() + ")\n");
history.append("(" + (int)P1.x + ", " + (int)P1.y + ") : ");
history.append("(" + (int)P2.x + ", " + (int)P2.y + ")\n");
Creating and using the BufferedPanel with graphics
The JPT component used for the display of graphics is a BufferedPanel. The latest graphics content is stored in a buffer and repainted when desired or when Java deems it necessary. As a result, displaying graphics is very pleasing with no flickering. The BufferedPanel comes with an automatically installed mouse listener. This feature will be explored in a subsequent tutorial. Here we only show how it can be used to display simple output graphics. The standard Java Graphics2D package is used for creating the actual graphics content.
We declare the BufferedPanel and a graphics context object that will refer to this panel later as follows:
// square window for painting
private BufferedPanel window =
new BufferedPanel(bufferWidth, bufferHeight);
// graphics context to draw lines and other shapes
private Graphics2D G = null;
We add the BufferedPanel to the GUI in the constructor as follows:
// wrap the graphics window into a titled display
Display windowDisplay =
new Display(window, null, "Graphics");
Finally, in the actions methods, we retrieve the graphics context, install the new graphics objects, and call the repaint() method to show the updated graphics state:
// get the graphics context to draw the line
Graphics2D G = window.getBufferGraphics();
// set paint color to user color choice
G.setPaint(color.getColor());
// line to draw - from P1 to P2
Line2D.Double L = new Line2D.Double(P1, P2);
G.draw(L);
repaint();
Installing the GUI components – Part 2
There are three new ideas in this program. The simplest is the fact that the DisplayCollection has selected a horizontal orientation as follows:
// control panel to combine point data displays
private DisplayCollection pointData =
new DisplayCollection(HORIZONTAL);
Next, the main GUI component is now a DisplayPanel with a BorderLayout. That allows us to install the controls on the WEST, the pointData panel on the SOUTH and the graphics window in the CENTER:
// class declaration:
public class SimpleDrawing extends DisplayPanel
// beginning of the constructor:
public SimpleDrawing() {
// layout for panel as a whole
setLayout(new BorderLayout());
// adding the highest level components to the main panel:
add(controls, BorderLayout.WEST);
add(windowDisplay, BorderLayout.CENTER);
add(pointData, BorderLayout.SOUTH);
Finally, we show how the reset() function for the main panel recursively calls the reset functions for all components it contains:
public void clear() {
// reset all components
reset();
// Note: the reset() is called recursively for all components
// That means that the following statements will be invoked:
// controls.reset(); which will then call
// color.reset();
// history.reset();
// actions.reset();
//
// pointData.reset(); which will then call
// startPoint.reset();
// endPoint.reset();
//
// to reset all states to their initial defaults
// clear the graphics window
window.clearPanel();
repaint();
}
JPT Idioms
ColorView
ColorView constructor:
private ColorView color =
new ColorView (
Color.red, // initial color displayed in the color view
true); // true = use text field view
color the color view identifier
Color.red Color - initial
value that will be displayed in the color view and will be used as the default
and the suggestion value
true boolean - use the text
field view in addition to the color swatch
Selecting click count for activating the color chooser:
color.setChooserClickCount(1);
color the color view identifier
1 integer - the
number of clicks needed to activate the color chooser
Extracting Color from the color view:
Color col = color.getColor();
col identifier for the Color object that will get the color
color the color view identifier
Extracting color from the color view in the form of XColor object:
XColor xcol = color.demandObject(); // or
XColor xcol = color.requestObject();
xcol identifier for the XColor object that will get the color
color the color view identifier
Note: only the mandatory model is supported for color view
Note: suggestion is automatically set to the initial color value
Extracting color from the color view in the form of a formatted String:
String colorString = color.getViewState();
colorString identifier for the String object that will get the formatted string representing the color
color the color view identifier
Setting the color form a formatted String in the data model:
color.setViewState(r + "," + g + "," + b);
color the color view identifier
r int - the red shade value
g int - the green shade value
b int - the blue shade value
Adding a color view to a Display:
controls.add(new Display(color, null, "Color:")));
controls identifier of a DisplayPanel
or a DisplayCollection
to which the color view is added
color identifier for the color view that is being installed
Sum String - the title that will appear on the top of the display border
null String - the annotation that will appear to the left of the view
Alternative way for adding a the color view to a Display:
controls.add(
new DisplayWrapper(
new Display(color, null, "Color:")));
By using the DisplayWrapper we assure that the color view will retain a sensible size when the window where it is contained is changes its size.
TextAreaView
TextAreaView constructor:
private TextAreaView history =
new TextAreaView();
history identifier for the TextAreaView object
Install TextAreaView into a scrollable display:
controls.add(
new DisplayWrapper(
new Display(new ScrollableDisplay(history), null, "History"));
controls identifier for the Display object where we install the scrollable
history identifier for the TextAreaView object
"History" title for the scrollable display
Append text to the TextAreaView:
history.append("Text to be appended");
history identifier for the TextAreaView object
"Text..." String that will be appended to the TextAreaView
BufferedPanel
BufferedPanel constructor:
private BufferedPanel window =
new BufferedPanel(bufferWidth, bufferHeight);
window identifier for the BufferedPanel object
bufferWidth integer constant indicating the width in pixels
bufferHeight integer constant indicating the height in pixels
Adding the BufferedPanel panel to the GUI:
Display windowDisplay =
new Display(window, null, "Graphics");
windowDisplay identifier for the Display object where the BufferedPanel will be placed
window identifier for the BufferedPanel object
"Graphics" title for the Display
Action methods will use the BufferedPanel by extracting its Graphics2D graphics context and adding graphics objects to it
Graphics2D extractor (inside the action method):
Graphics2D G = window.getBufferGraphics();
G identifier for the Graphics2D object
window identifier for the BufferedPanel object
Sample use of the graphics context:
The functions defined in the Graphics2D are called to place graphics objects into the BufferedPanel window
// set paint color to user color choice
G.setPaint(color.getColor());
G identifier for the Graphics2D object
color identifier for the ColorView object
// line to draw - from P1 to P2
Line2D.Double L = new Line2D.Double(P1, P2);
G.draw(L);
G identifier for the Graphics2D object
L identifier for the Line2D.Double object that will be displayed
P1 identifier for the Point2D.Double object that represents the start point of the line
P2 identifier for the Point2D.Double object that represents the end point of the line