In this section we will build several programs that use a few of the JPT GUI components. Each program is short enough that most of its functionality is enclosed in a single class. However, we will delineate clearly which part of the code is responsible for the View, for the Model, for the Action, and for the GUI building segment of the program.
Description of the Simple Integer Adder program
JPT Techniques
Creating and using the TextFieldView
Defining and using Actions
Installing GUI Components – Part 1
Adapting the TextFieldView for use with double
In this program we will use TextFieldView and Actions. TextFieldView is a JPT GUI component that can be used to for input and display of typed text. Actions connect buttons with user-defined methods that are performed when the button is pressed.
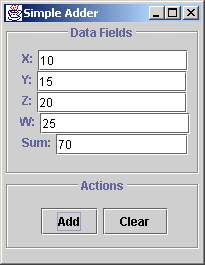
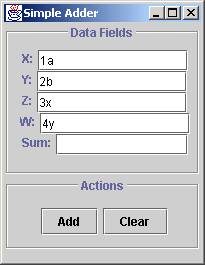
We build a simple program that will add the values of four integers typed in by the user. Two snapshots of the view of the entire GUI are shown below.
View
This program uses four TextFieldViews to allow the user to type in the input and one TextFieldView to display the result. This represents the View part of this program. The first snapshot shows the initial values displayed in the four input fields, as well as the result displayed in the Sum field after the Add action has been performed. The second snapshots shows illegal values typed into the four input fields.
Model
The internal data model consists of five integer variables - the four inputs and the result. This represents the Model part of the program.
Actions
The action is just a simple integer addition of the four numeric values. The program uses one ActionsPanel with two associated Actions. One Action performs the addition of four integers whose values are extracted from the four TextFieldViews. The sum is displayed in the fifth TextFieldView. The second Action resets the view state of the TextFieldViews to their original default values. This represents the Action part of the program.
GUI
The GUI is a DisplayCollection enclosed in a QuickJPTFrame titled Simple Adder. This display collection contains two GUI components: a DisplayCollection titled Data Fields and an actions Display titled Actions. The data fields display collection contains five annotated Displays that hold the TextFieldViews. The actions display holds ActionsPanel that contains the two Action buttons.
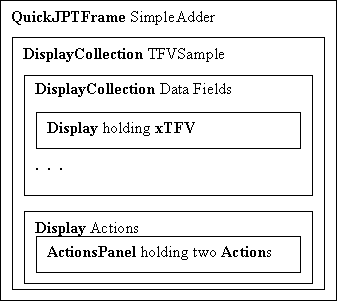
The diagram shows the recursive nature of GUI design - display collections inside display collections inside displays, with the views and actions at the lowest level of the recursion.
Creating and using the TextFieldView
We will start by explaining the building of the output TextFieldView - the simplest of them all.
// sumTFV will only be used to display the result
// Last two parameters are never used
// they pertain to the modal error dialog box - not needed for output
private TextFieldView xyzTFV =
new TextFieldView(
"", // initial value displayed in the field
"No fix needed", // prompt for correction - not needed
"Output only"); // label for error dialog - not needed
The constructor for a TextFieldView asks for three String arguments - the initial String to display, the label for the modal error dialog panel, and the prompt for the correction of this error. We cannot have errors in a view used only for display of the result String, and so, only the first parameter is meaningful. In the snapshot above, this field is labeled as Sum: and currently displays the String "70". The label for this field and its size and placement in the GUI is done later, when we actually construct the content pane for Simple Adder.
The TextFieldViews for the four input fields look as follows:
// xTFVC will be used to input a required integer input
private TextFieldView xTFV =
new TextFieldView(
XVALUE, //
initial value displayed in the TFV
"X has to be an integer:", // prompt for correcting the input
"Incorrect input"); //
title for the error dialog box
Note that here the two remaining fields contain meaningful messages to the user, in case there is an error in processing the input.
The code for the add function illustrates how the data model extracts the values from the TextFieldView and places new Strings into the view. There are two modes for extracting data from a TextFieldView: the optional model, when the user may decline to provide any input and the exception has to be caught, and the mandatory model, when an error produces a modal dialog that persists until a valid input is supplied.
Independently, the programmer may supply a suggested value that is available to the user within the error dialog window. The four input fields illustrate the four possible combinations of these data extraction methods.
public void add() {
int x, y, z, w;
int sum;
// optional input using request
// try-catch is needed since user may cancel the input operation
// note that no suggestion is specified for this text field view
try {
x = xTFV.requestInt();
}
catch (CancelledException ex) {
// user input is invalid, so invalidate the sum view and return
sumTFV.setViewState("");
return;
}
// optional input using request
// try-catch is needed since user may cancel the input operation
// note that this text field view has suggestion for error recovery
try {
y = yTFV.requestInt();
}
catch (CancelledException ex) {
// user input is invalid, so invalidate the sum view and return
sumTFV.setViewState("");
return;
}
// mandatory input using demand
// note that no suggestion is specified for this text field view
z = zTFV.demandInt();
// mandatory input using demand
// note that this text field view has suggestion for error recovery
w = wTFV.demandInt();
// compute the sum
sum = x + y + z + w;
// update the sum text field view to show the result
sumTFV.setViewState(sum + "");
}
The functions demandInt and requestInt parse the String currently displayed in the view and attempt to convert it to an int value. If this process fails, an error dialog appears automatically. The demand command triggers the mandatory input mode, the request command triggers the optional input mode. Depending on the manner in which the data model extracts the values from the view, the error dialog box may have one of the following forms:
optional model - request
optional model - request
with suggestion
mandatory model - demand

mandatory model - demand
with suggestion
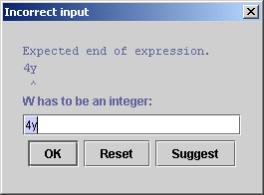
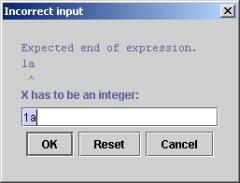
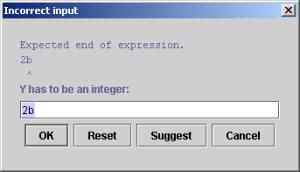
We see that the label of the error dialog box has been set to the specified text. The parser provides the string with the error location shown. The prompt for the corrected input has been specified by the programmer. The control buttons correspond to the input mode and the presence or absence of suggestion. The requests for x and y values uses the optional model - and we see in the code that we need to catch the CancelledException. The demands for z and w values do not allow the user to exit the error dialog until valid input has been given.
To set the view state, we supply the String that will be displayed in the TextFieldView:
// update the sum text field view to show the result
sumTFV.setViewState(sum + "");
We still need to see where the programmer provides the Suggestion for the user. A Suggestion is stored as one of the InputProperties:
// set suggestions
yTFV.getInputProperties().setSuggestion("100");
wTFV.getInputProperties().setSuggestion("200");
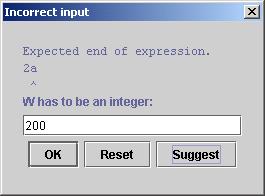
The snapshot shows the error dialog box for wTFV after a suggestion has been selected.
These input properties can be added to a TextFieldView at any time - and can be modified during the execution of the program, So for example, if the TextFieldView displays a counter, the Suggestion can be updated to always represent the next item in the order.
The code for the clear function illustrates again how the data model or any part of the program can display the desired string in the TextFieldView.
public void clear() {
// reset all view states to those used in the constructor
xTFV.setViewState(XVALUE);
yTFV.setViewState(YVALUE);
zTFV.setViewState(ZVALUE);
wTFV.setViewState(WVALUE);
sumTFV.setViewState("");
}
Defining and using Actions
The two functions, add and clear are the two actions the program can perform. In the GUI there are two buttons labeled Add and Clear that let the user select one of these actions. We will learn how the controls that trigger these actions are created.
We have already seen that actions are functions that the user wants to perform when some "action buttons" are pressed. There could be a list of functions to perform, but for now, we assume each button corresponds to a single function. We define the functions as we would define any methods in a class.
The Actions are objects that connect the name of the button with the method that will be called when button is activated. Note that the name of the action object is the same as the name of the function that will be invoked. This is not a requirement, but a convenience. Thus, the programmer only needs to select three identifiers (the name of the SimpleAction object add or clear, the corresponding name of the function to call for this action add(); or clear();, and finally a label for the action button "Add" or "Clear".
/*
* the add action
is constructed using
* the String "Add" to name its
button
* and specifying the add method to be
performed when pressed
*/
private Action
add =
new
SimpleAction("Add") {
public
void perform() { add(); }
};
/*
* the clear
action is constructed using
* the String "Clear" to name its
button
* and specifying the clear method to be
performed when pressed
*/
private Action
clear =
new SimpleAction("Clear")
{
public
void perform() { clear(); }
};
An ActionsPanel is a JPT GUI component that can contain one or more actions manifested as buttons. We first construct and array of Actions objects, then use this array as a parameter to the constructor for the ActionsPanel as follows:
Define the array of actions:
/*
* array of
actions is constructed
*/
private Action[]
actionList = {add, clear};
Construct the array panel:
// actions panel
/*
* actions panel
is constructed
* with the
actions it will contain supplied as parameter
*/
private
ActionsPanel actions = new ActionsPanel(actionList);
The actions panel is added to the overall display when we compose the entire GUI.
Installing the GUI components – Part 1
The main program calls the createQuickJPTFrame function that creates a window with the given title and calls a constructor for the main GUI content pane TFVsample that extends a DisplayCollection.
/*
* create a window
* titled "Simple Adder"
* whose contents are defined by the TFVsample
constructor
*/
public static void
main(String[] args) {
JPTFrame.createQuickJPTFrame("Simple Adder", new
TFVsample());
}
The constructor places the various GUI components in their locations and adds more labels and annotations.
/*
* constructor for the graphical user interface of the application
* installs four input views and one output view
* installs an action panel with two action buttons - add and clear
* sets the preferred width for all text field views
* sets the suggestion for two of the four input views
* wraps and titles data fields and actions
* and adds them to the main panel
*/
The constructor consists of two sections: the View section and the GUI building section. We start with the View section:
public TFVsample() {
//////////////////
// View Section //
//////////////////
// set preferred width for the text fields
xTFV.setPreferredWidth(150);
yTFV.setPreferredWidth(150);
zTFV.setPreferredWidth(150);
wTFV.setPreferredWidth(150);
sumTFV.setPreferredWidth(132);
// set suggestions
yTFV.getInputProperties().setSuggestion("100");
wTFV.getInputProperties().setSuggestion("200");
We specified the widths of the five TextFieldViews and added the suggestions to two of the input fields.
Then comes the GUI building section. There are five statements that add each of the five TextFieldViews to the dataFields DisplayCollection:
/////////////////
// GUI Section //
/////////////////
// add text fields and actions panel
// to the dataFields DisplayCollection
// add xTFV to dataFields
dataFields.add(
new DisplayWrapper(
new Display(xTFV, "X:", null)));
The parameters for Display specify the TextFieldView object, an annotation to appear before the view, and the last parameter indicates that we do not wish to title this display. Enclosing a Display in a DisplayWrapper prevents it from unsightly stretching or shrinking caused by the Java layout managers.
We now wrap the data fields and actions into another Display - we title these displays but do not use annotations. Finally we add these two displays to the TFVSample display collection;
// build two titled displays and add them to the main panel
// wrap dataFields into a titled display
Display dataFieldsDisplay =
new Display(dataFields, null, "Data Fields");
// wrap actions into a titled display
Display actionsDisplay =
new Display(actions, null, "Actions");
// add data field display and actions display to the main panel
add(dataFieldsDisplay);
add(actionsDisplay);
Adapting the TextFieldView to use double
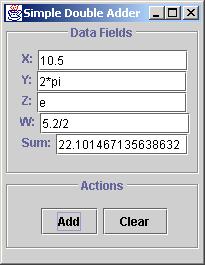
To modify the first program so that it would add doubles instead if ints, we only have to do a few things. The GUI now looks as follows:
The TextFieldViews do not care what they display. If in the error dialog we had used a prompt such as "Fix X value:", there would be no changes. However, we now have to modify the TextFieldView definitions to include a correct prompt:
private TextFieldView xTFV =
new TextFieldView(
XVALUE, //
initial value displayed in the TFV
"X has to be a double:", // prompt for correcting the input
"Incorrect input"); //
title for the error dialog box
Of course, the add method needs to change the types of the five variables to doubles and the statements used to extract values from the views change from requestInt and demandInt to requestDouble and demandDouble, respectively. For example we write:
// mandatory input using demand
// note that no suggestion is specified for this text field view z = zTFV.demandDouble();
We must also change the constants that are used to set the initial display in the four input views:
// constants: used to set and reset text fields
private static final String XVALUE = "10.5";
private static final String YVALUE = "2*pi";
private static final String ZVALUE = "e";
private static final String WVALUE = "5.2/2";
The parser recognizes pi and e as double values and can also parse any valid arithmetic expression. It even correctly converts 1/0 to Infinity and computes that the sum of two doubles 1/0 + (-1/0) results in NaN (not a number as specified in IEEE Standard).
Finally, because we changed the name of the class, we have to change the constructor name and use the correct class constructor TFVDoubleSample when calling the createQuickJPTFrame function in main and we must modify the title of the application window appropriately:
JPTFrame.createQuickJPTFrame
("Simple Double Adder", new TFVdoubleSample());
This completes the discussion of the second program. We encourage the reader to explore the behavior of both adders with different expressions. It can be used in a classroom to explain the rules of integer and double arithmetic in Java.
TextFieldView (TFV)
TextFieldView constructor:
private TextFieldView xTFV =
new TextFieldView(
XVALUE, // initial value displayed in the TFV
"X has to be a double:", // prompt for correcting the input
"Incorrect input"); // title for the error dialog box
xTFV the text field identifier
XVALUE String - initial
value that will be displayed in the TFV
"X has ...:" String - prompt
for correcting the input - in the error dialog box
"Incorrect..." String - title
of the error dialog box
Adding a suggestion to the TFV:
yTFV.getInputProperties().setSuggestion("100");
xTFV identifier for the TFV that will get the suggestion
"100" String - the
value that will be displayed in the TFV when user asks for a suggestion (by
selecting Suggest button)
Setting the String displayed in the TFV:
sumTFV.setViewState(sum + "");
sumTFV identifier for the TFV that will get the suggestion
sum + "" String - the
value that will be displayed in the TFV
Extracting the input from TFV using the mandatory model:
double z =
zTFV.demandDouble();
double z identifier for the variable or object that will receive the input
zTFV identifier for the TFV that will supply the input
demandDouble demand followed by the basic data type of the expected input
Extracting the input from TFV using the optional model:
try {
int x = xTFV.requestInt();
}
catch (CancelledException ex) {
// code to execute if incorrect input
is not fixed
return;}
int x identifier for the variable or object that will receive the input
xTFV identifier for the TFV that will supply the input
requestInt request followed by the basic data type of the expected input
Seting the preferred width for TFV:
xTFV.setPreferredWidth(150);
xTFV identifier for the TFV that has its width set
150 the preferred width in pixels
Adding a TFV to a Display:
dataFields.add(new Display(sumTFV, "Sum:", null)));
dataFields identifier of a DisplayPanel
to which TFV is added
sumTFV identifier for the TFV that is being placed in the DisplayPanel
"Sum:" String - the annotation that will appear left of the TFV
null String - the label of the Display. The Display will be bounded and the label will appear on the top of the bounding box. Nothing will be visible if label is null.
Alternative way for adding a TFV to a Display:
dataFields.add(
new DisplayWrapper(
new Display(xyzTFV, "Sum:", null)));
By using the DisplayWrapper we assure that the TFV will retain a sensible size when the window in which it is contained changes its size.
ActionsPanel and Action
We need an ActionsPanel and one Action for each action we wish to perform:
Action declaration and initialization:
private Action add = new SimpleAction("Add") {
public void perform(){ add(); }
};
add identifier for the SimpleAction object
"Add" label for the action button
add(); method that will be called on button press
Constructor for a list of actions to be used to initialize ActionsPanel
private Actions[] actionsList = {add, clear};
actionsList identifier for the Actions array object
add identifier for the first SimpleAction object to be used
clear identifier for the second SimpleAction object to be used
ActionsPanel constructor:
private ActionsPanel actions = new ActionsPanel(actionsList);
actions identifier for the ActionsPanel object
actionsList identifier for the list of actions this panel will contain
Adding the actions panel directly to the GUI display collection inside its constructor:
add(actions);
actions identifier for the ActionsPanel object to add to the DisplayCollection
Alternative way for adding the actions panel to actionsDisplay Display:
Display actionsDisplay = new Display(actions, null, "Actions");
add(actionsDisplay);
actionsDisplay identifier
for the Display
to be built
actions identifier for the ActionsPanel object to add to the Display
null String - annotation of the Display (not used)
"Actions" String - title for the Display