Building a MiniPaint Application
Description of the MiniPaint program
Design Steps
Step1: Designing the GUI
Step 2: Specifying Actions
Step 3: Defining the member data for GUI components
Step 4: Defining the Actions
Refactoring: Creating Point2DView and Xpoint2D class
This program we will introduce BooleanView and OptionsView and shows how how the text from the TextAreaView can be easily saved to a file through the use of FileView. The tutorial will also illustrate the design process, rather than commenting on a completed program.
Description of the MiniPaint program
The MiniPaint application allows the user to select one of four possible shapes to be drawn: a line, a rectangle, an oval, or a circle. The user selects the shape, the color, and then selects two points with a mouse click. Once the second point is selected, the shape is drawn. For a rectangle, the two selected points represent the opposite corners. The oval will be drawn inside the selected rectangle region. When selecting a circle, the user first selects the center, then selects a point on the circle. Every time a shape is painted, the color, the shape type, and the two selected points are saved to the history.
In addition, the user can choose to clear all information, to save the history to a file, and to indicate that a new "first point" should be selected.
Step1: Designing the GUI
We start by identifying all the views that we will need to display the information user needs to see. Of course, there will be BufferedPanel for the graphics. There should be TextfieldViews to display the points that select the size and location of the shape to be drawn and the mouse position. There will be ColorView for choosing the color. We will need a place where to keep the history - this will be a TextAreaView. The choice of shape will be determined by selecting one button among four in an OptionsView. Finally, we will have theee actions: Clear and Save and NewFirstPoint. Later we will see how a pair of TextfieldViews can be used to build a single Point2DView.
We can sketch the layout of these views and their enclosing display type objects until we are quite comfortable with the design. You may try some designs before committing to ours. We sketch below a picture that illustrates our GUI design. In reality, a designer makes several such sketches before the final design emerges. The key point is to capture all GUI components – not necessarily their final arrangement in the overall display.
Our design for the GUI
Step2: Specifying the Actions
Clear Action
This is the standard action and will be copied verbatim from the SimplePainter program.
New First Point Action
In a manner similar to the SimplePainter, we will need a state variable firstPoint that will specify which point is being selected. The action method is like the startNewPolygon action in SimplePainter : it sets the state variable firstPoint to true.
Save to the File Action
Here we want to save the entire context of the TextAreaView to a file. The method will create a FileView that brings up the file chooser dialog. The action starts by disabling all other fields until the file save is completed or aborted. We then create a new JFileChooser and decide that the files we will save will have a suffix .paint. We can set a file filter, so that the chooser suggests that the files have the selected suffix. The suffix choice is not enforced. If no file was selected, the file save is aborted, we enable previously disabled fields and return. If a file was selected, we try to write to the file the String extracted from the history TextAreaView through the use of getViewState function. Finally, we enable previously disabled fields and return.
Notice that any String extracted from arbitrarily complex view can be saved to the file in one step. Later, we will save a whole array of data at once. Similarly, if we can set the view state for a complex view from a String, then the entire view state may be set by reading one String from a file.
Also notice, that anyone working with files can follow verbatim the pattern used here – supplying only the suffix and the name of the view object for which the data should be saved.
Mouse Actions
MouseMoved Action
This is the tracking action from SimplePainter. The only difference is that we need to consult the state variable firstPoint to see which set of TextFieldViews should be set.
MouseClicked Action
This is the workhorse of this application. First, the mouse location is used to set the TextFieldViews for the second point and the data for both points is extracted to two Point2D objects P1 and P2. Next, the color is set using the information from the ColorView. The information from the OptionsView, an integer indicating the current selection, is used in a switch statement to perform the painting of appropriate shape. The details, like making sure any two opposing points of a rectangle specify a valid rectangle, or the computation of the bounding box for the circle from the computed radius should be delegated to helper functions. Once the shape is painted, the information about the shape should be saved in history TextAreaView. Finally, the firstPoint has to be set to true to indicate we need to select the first point again.
Step3: Defining the Member Data for the GUI Components
We need to do this before we can define the actions methods, because these methods will be extracting data from the views.
The three pairs of TextFieldViews were originally contained in DisplayCollections named firstPointData, secondPointData, and mousePointData. We will show how these were replaced by three Point2Dviews named firstPoint2DView, secondPoint2DView, and mousePoint2Dview. The history and color views are the same as in SimplePainter program. The BooleanView nextPointChoice has a label First Point next to the checkbox. The OptionsView drawSelectionView is initialized by supplying an array of Strings that will be used as labels for the possible choices – the size of this array determines the number of options available. Of course, we need a BufferedPanel for the graphics.
Snapshot of the MiniPaint application
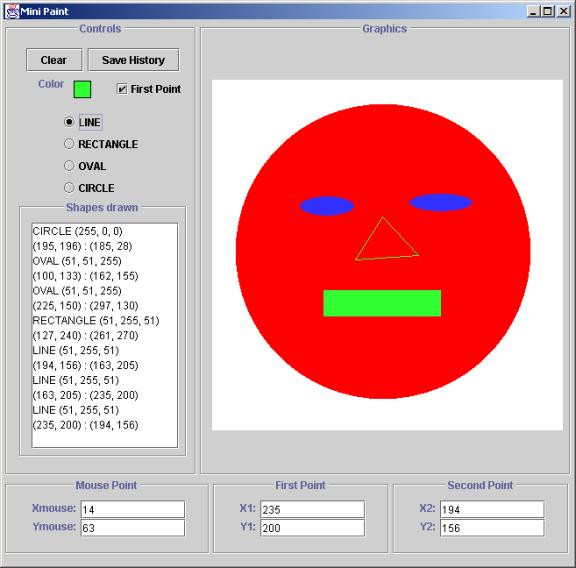
Data saved in the file SillyFace.paint file:
CIRCLE
(255, 0, 0)
(195,
196) : (185, 28)
OVAL
(51, 51, 255)
(100,
133) : (162, 155)
OVAL
(51, 51, 255)
(225,
150) : (297, 130)
RECTANGLE
(51, 255, 51)
(127,
240) : (261, 270)
LINE
(51, 255, 51)
(194,
156) : (163, 205)
LINE
(51, 255, 51)
(163,
205) : (235, 200)
LINE
(51, 255, 51)
(235,
200) : (194, 156)
Step4: Defining the Actions
At this point we can write the actual code for the actions. The specification given earlier guides us through the details and no further discussion is necessary.
Refactoring: Creating Point2DView and Xpoint2D class
If a collection of several views appears in the program several times in the same configuration, it is desirable to package several views into one compound view. The code in the two files Point2DView.java and Xpoint2D.java illustrates how this is done.
The Point2Dview class needs to implement TypedView, because it contains two TypedView components. This means we need to define the requestObject and demandObject functions, the getDataType function that returns the class this view represents, and the getInputProperties and setInputProperties functions.
Because TypedView interface extends Displayable interface, we also need to implement the functions setViewState, getViewState, setDefaultViewState, and getDefaultViewState. We need not redefine the reset and setEnabled functions because we are extending the Display class.
The setViewState and getViewState functions illustrate the use of codec utilities that encode a collection of items into a String and perform the inverse operation to extract the data values from the encoded String.
The demandObject and requestObject functions return Stringable. This means that we also have to build a Stringable version of the Point2D.Double class as seen in XPoint2D.java. This class extends the Point2D.Double class and implements the Stringable interface by defining the fromStringData and toStringData functions. Additional setValue functions allow us to change the values stored in an XPoint2D object. Note that the primitive Stringable classes in the JPT extend XObject but it is more convenient here to have XPoint2D extend Point2D.Double.
JPT Idioms
BooleanView
BooleanView constructor:
private BooleanView nextPtChoice =
new BooleanView
("First Point", // String shown with the check box
FIRSTPOINT); // initial and default value
nextPtChoice identifier
for the BooleanView
object
"First Point" String - label shown with the check box
FIRSTPOINT Boolean - initial value that will be displayed in the Boolean View
and the one that will be used as a default
Extracting a value from a BooleanView
Boolean firstPoint = nextPtChoice.getBooleanValue();
firstPoint identifier for the Boolean object that will get the selected value
nextPtChoice identifier
for the BooleanView
object
OptionsView
OptionsView constructor:
private OptionsView drawSelectionView =
new OptionsView
(drawSelection, // array of label Strings to identify
// the options
defaultSelection, // integer to specify default choice
new GridLayout(4,0)); // layout for the view
drawSelectionView identifier
for the OptionsView
object
drawSelection array
of Strings:
labels for the OptionsView
items
defaultSelection int – the initial and default
choice
new GridLayout(4,0) LayoutManager –the desired layout for the view
Extracting a value from a OptionsView
int selection = drawSelectionView.getSelectedIndex();
selection identifier for the int object that will get the selected option index
drawSelectionView identifier for the OptionsView object
JFileChooser, FileView, and writing to a file
We need to build a JFileChooser, (a Java object), use the FileUtilities to write to a file, and, optionally, set the desired file extension.
JFileChooser declaration and initialization (java.swing class):
JFileChooser chooser = new JFileChooser(".");
chooser identifier for the JFileChooser object
"." String specifies current directory path for the chooser
our choice indicates that the chooser starts in the current directory
Setting the file filter:
chooser.setFileFilter(new FileViewExtensionFileFilter("paint");
chooser identifier for the JFileChooser object
"paint" String specifies the file suffix to be used
Checking if a file selection has been made (java.swing code):
if (chooser.showSaveDialog(null) != JFileChooser.APPROVEOPTION){
//perform cancelled action}
chooser identifier for the JFileChooser object
Writing to a selected file:
try{
FileUtilities.writeFile(chooser.getSelectedFile(),
history.getViewState(),
true);
}
catch(Exception e){
System.out.println(“Exception:” + e);
}
chooser identifier for the JFileChooser object
history identifier for the view from whose contents will be written
true Boolean - true value indicates it is OK to rewrite file