DUE: 12:01am, Mon Apr 18
Worth: 15% of your final grade
For this homework you will implement a ray tracer along the lines of that described in Chapter 4 of the course text (Shirley and Marschner, 3rd edition). All input data will come from a text file, but the format of this file will not be the same as in prior assignments. Also, different from prior assignments, the resulting program need only produce a single static image of the scene—interactive viewpoint navigation is extra credit.
For this assignment you must read the input file from the standard input stream. If your program is written in java, then you must be able to run it from the command line like this:
java HW6_Sample < input.rts
This way it is much faster and less laborious (less typing both for you and for us) to run your program on different inputs because it allows
cat input0.rts input1.rts input2.rts | java HW6_SampleNote that one consequence of reading from standard input is that it is not always possible to rewind the input stream, as you would need if you were going to make multiple passes over it. It is not necessary to make multiple passes over the input. There may be forward references in the input. This is not a problem. Just parse every line as you see it and store the references. Then, do all dereferencing after reading the entire input.
The input file for this assignment is an ASCII text file. By convention, the file name extension is “.rts” which stands for “ray tracing scene.” However, your program should not care about the filename.
Each line has a syntax determined by its first two characters. (The meaning, or semantics, of each line type is described in detail below.)
Line types marked with an * are extra credit features.
| line type | start | rest | ||
|---|---|---|---|---|
| comment | ## | any text | ||
| vertex | vv | |||
| ambient material | am | |||
| diffuse material | dm | |||
| specular material | sm | |||
| triangle | * | ts | ||
| sphere | ss | |||
| plane | ps | |||
| settings | se | |||
| point light | pl | |||
| directional light | dl | |||
| camera | cc | |||
| translation | * | tx | ||
| rotation | * | rx | ||
| homogneous xform | * | hx | ||
| undo transform | * | ux | ||
| clear transform | * | ix | ||
| start model | * | so | ||
| end model | * | eo | ||
| instance model | * | io | ||
| rebase indexing | * | rv |
Each type of line may appear any number of times in the input. They may come in any order, but the relative order does matter for some types of lines, as detailed below.
All values on a line are whitespace separated (one or more spaces or tabs).
Your program must tolerate lines that do not start with any of the above prefixes, or any that you do not implement. You may emit a warning message, but you should effectively ignore any such line. This can allow your program to process input files that include extra-credit extensions (but ignore those extensions).
The values ![]() stand for any floating point number in the following format: (a) an optional leading + or - symbol; (b) between 1 and 4 decimal digits; (c) an optional fractional part consisting of a decimal point and between 1 and 4 decimal digits.
stand for any floating point number in the following format: (a) an optional leading + or - symbol; (b) between 1 and 4 decimal digits; (c) an optional fractional part consisting of a decimal point and between 1 and 4 decimal digits.
The values ![]() are also floating point numbers in the same format, but they are restricted to the range
are also floating point numbers in the same format, but they are restricted to the range ![]() (your program should clamp input values for these values outside that range).
(your program should clamp input values for these values outside that range).
The values ![]() are non-negative integers.
are non-negative integers.
The value ![]() is an integer in the range
is an integer in the range ![]() .
.
The values ![]() are either that literal ASCII character, or the x character. For example,
are either that literal ASCII character, or the x character. For example, ![]() could be either d or x.
could be either d or x.
The value ![]() is a word starting with any of the characters A-Z, a-z, or _, and continuing with any number of the same characters plus the characters 0–9 and -.
is a word starting with any of the characters A-Z, a-z, or _, and continuing with any number of the same characters plus the characters 0–9 and -.
Each line starting in vv defines a 3D vertex in world frame. The first three numbers are the vertex location ![]() , and the last three numbers are a direction vector at that location
, and the last three numbers are a direction vector at that location ![]() , which has different meanings in different situations, as described below.
, which has different meanings in different situations, as described below.
Your program must create a vertex array corresponding to all the vertices specified in the input, in order. If there are ![]() vertices in the input, this array will have
vertices in the input, this array will have ![]() entries, indexed from
entries, indexed from ![]() to
to ![]() . In a language like Java, an easy way to implement this is to store each vertex as you read it from the input into a
. In a language like Java, an easy way to implement this is to store each vertex as you read it from the input into a List l (typically ArrayList is used in a situation like this, but LinkedList will work also). Then after the entire input has been processed, convert the list to an array by calling l.toArray().
Lines starting am, dm, and sm change the settings for the ambient, diffuse, and specular parts of the current material properties.
Before starting to read the input, you must initialize all material properties as follows:
Then upon reading one of the *m material lines from the input, simply update the corresponding values.
Lines starting ts, ss, and ps define triangle, sphere, and plane surfaces. In each case, the surface is defined by specifying one or more indices into the vertex array (note, these indices can be in the range ![]() where
where ![]() is the total number of vertices in the input, not just the number of vertices read so far at the time the surface is introduced).
is the total number of vertices in the input, not just the number of vertices read so far at the time the surface is introduced).
Your program must create some type of datastructure to store all the surfaces specified in the input (again, a simple list is reasonable). Each surface must also store the material properties that were in effect at the time the surface was read from the input.
These line types enable you to move and distort surfaces.
You can skip this section unless you plan to implement this extra credit feature.
Lines starting tx, rx, and hx multiply a new transform onto the current composite model transform (CMT) ![]() .
.
Before starting to read the input, initialize the CMT to the identity transform.
 .
.The ix line sets the CMT back to the identity matrix.
The ux line should undo the transform ![]() from the most recent tx, rx, or hx line since the start of the input or the most recent ix line, if any. I.e.
from the most recent tx, rx, or hx line since the start of the input or the most recent ix line, if any. I.e. ![]() . (If there was no previously multiplied transform, the ux line does nothing.)
. (If there was no previously multiplied transform, the ux line does nothing.)
Each time you parse a surface, store a copy of the current CMT at the time of reading that surface, just as you store a copy of the current material properties. Then treat all vertices of that surface to be transformed by that CMT when you render them.
These line types enable you to very flexibly place multiple copies of models at arbitrary locations in your scene.
You can skip this section unless you plan to implement this extra credit feature.
A line starting so begins the definition of a model with the given name. All surfaces encountered until the subsequent eo (end model) line are considered part of that model. It is an error to have an so line without a matching eo line. Further, it is an error to have any so line after another so but before the matching eo.
If the eo line has its ![]() flag set, then the model is hidden, and no copy of it is added to the scene until it is instantiated. Otherwise, an initial copy of each surface in the model is added to the scene just as for surfaces that are not part of a model definition.
flag set, then the model is hidden, and no copy of it is added to the scene until it is instantiated. Otherwise, an initial copy of each surface in the model is added to the scene just as for surfaces that are not part of a model definition.
A line starting io instantates the named model, i.e., adds a copy of all the surfaces included in the model to the scene. It is an error to instantiate a model that is never defined, but it is not an error to instantate a model before it is defined.
You can handle io similar, but not exactly, the same as if all the surfaces in the model were copied to that point in the file. The only difference is that if ![]() is the CMT that was in effect at the time the surface was first defined, and
is the CMT that was in effect at the time the surface was first defined, and ![]() is the CMT that is in effect at the time the model is instanced, you must use their compound
is the CMT that is in effect at the time the model is instanced, you must use their compound ![]() as the actual CMT for that instance of that surface.
as the actual CMT for that instance of that surface.
Finally, to make mixing different models into the same input file more convenient, the rv line adds flexibility to the vertex indexing scheme. If ![]() is the index given on the rv line, and the next vertex index at the time of reading that line was
is the index given on the rv line, and the next vertex index at the time of reading that line was ![]() , then all subsequent vertex indices (both the index implied when reading a vv line and the explicit vertex reference indices in surface and other line types) must be adjusted by
, then all subsequent vertex indices (both the index implied when reading a vv line and the explicit vertex reference indices in surface and other line types) must be adjusted by ![]() before storing.
before storing.
A line starting se defines some parameters to turn on or off different aspects of the rendering. Again, only the last such line should take effect.
Recall that the contents of this line have the format ![]()
![]()
![]()
![]()
![]() , with the first three being either the indicated ASCII character or x, and the last two a non-negative integer and a value in the range
, with the first three being either the indicated ASCII character or x, and the last two a non-negative integer and a value in the range ![]() .
.
The ![]() values are flags that turn on or off diffuse (Lambertian) shading, specular (Blinn-Phong) shading, and shadows (text section 4.7), respectively. Each feature is turned on by specifying the corresponding character, and off by specifying x.
values are flags that turn on or off diffuse (Lambertian) shading, specular (Blinn-Phong) shading, and shadows (text section 4.7), respectively. Each feature is turned on by specifying the corresponding character, and off by specifying x.
The integer ![]() gives the maximum recursion depth for mirror reflection (text section 4.8). Setting
gives the maximum recursion depth for mirror reflection (text section 4.8). Setting ![]() effectively turns off mirror reflection. Mirror reflection is extra credit.
effectively turns off mirror reflection. Mirror reflection is extra credit.
The value ![]() gives the ambient light intensity.
gives the ambient light intensity. ![]() turns off ambient light, and
turns off ambient light, and ![]() gives maximum ambient light.
gives maximum ambient light.
Before starting to read the input, set all features to “on” with ![]() and
and ![]() .
.
Lines starting pl and dl introduce point and directional lights into the scene. In each case the light parameters are again specified as an index into the vertex array. The value ![]() is the intensity of the light.
is the intensity of the light.
Besides any point and directional lights specified in the input file, there is also always ambient light.
All lights are white, i.e. the light color is always ![]() .
.
You will likely want a separate datastructure to store all lights specified in the input. Another list is a reasonable choice.
A line starting cc defines the camera pose. There is only one camera, so if there are multiple cc lines, only the last will take effect. The camera is specified by giving its location and viewing direction, again as an index into the vertex array.
For this assignment, you will implement perspective projection. The eye point ![]() is given by the
is given by the ![]() coordinates of the indicated vertex. The view direction (the
coordinates of the indicated vertex. The view direction (the ![]() axis of camera frame) is along the vertex direction
axis of camera frame) is along the vertex direction ![]() , i.e.
, i.e. ![]() . The
. The ![]() axis of camera frame is along the direction given by the cross product
axis of camera frame is along the direction given by the cross product ![]() (your program should signal an error and ignore the input line if
(your program should signal an error and ignore the input line if ![]() ). Once you have computed
). Once you have computed ![]() and
and ![]() , normalize them to get
, normalize them to get ![]() and
and ![]() . Finally, compute
. Finally, compute ![]() . You now have an orthogonal basis for the camera frame, expressed as three orthonormal vectors in world frame coordinates.
. You now have an orthogonal basis for the camera frame, expressed as three orthonormal vectors in world frame coordinates.
Before starting to read the input, initialize ![]() and set the camera frame axes to the standard basis. This places the default camera at the origin of world frame looking down the negative
and set the camera frame axes to the standard basis. This places the default camera at the origin of world frame looking down the negative ![]() world axis, with the world frame
world axis, with the world frame ![]() axis up. Upon reading each cc line in the input, update all the camera parameters. The effect will be that if there are zero cc lines in the input, the camera will remain at its default location, but otherwise it will move to the pose given in the last valid cc line.
axis up. Upon reading each cc line in the input, update all the camera parameters. The effect will be that if there are zero cc lines in the input, the camera will remain at its default location, but otherwise it will move to the pose given in the last valid cc line.
Further details of the perspective camera model are given below.
It is strongly recommended that you follow this order. It will be much easier for the course staff to help you with your program that way.
A variety of RTS format input files are provided here. We also provide the program CheckerboardGenerator.java to generate checkerboard “ground planes” using triangles (which are extra credit).
This sample shows the format of the input file and illustrates that vertices may be referenced before they are defined.
## sample input file
se d s x 2 0.3
cc 4
pl 5 0.8
dl 6 0.5
vv 0 0 -10 -1 -1 3
am 1 0 0
vv 10 0 -10 1 -1 3
dm 1 0 0
vv 0 0 -100 0 50 0
sm 1 1 1 16
ts 0 1 3
am 0 1 0
dm 0 1 0
ss 2
vv 10 10 -10 1 1 3
vv 0 0 10 0 0 -1
vv 100 100 0 0 0 0
vv 0 0 0 0 0 -1

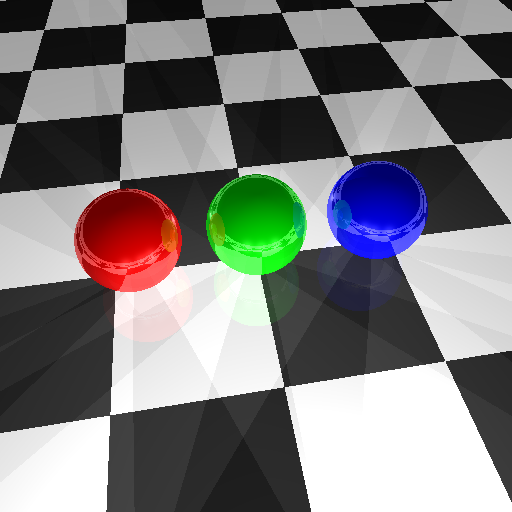
In this rendering, diffuse and specular shading are turned on, shadows are turned off, and the maximum recursion for mirror reflection computations is 2.
There are ![]() vertices with indices
vertices with indices ![]() through
through ![]() .
.
The camera is defined by the vertex at index 4, so the eye point is at ![]() in world frame and the view direction is
in world frame and the view direction is ![]() .
.
In addition to ambient light with intensity 0.3, there is a point light at ![]() with intensity 0.8 and a directional light with direction
with intensity 0.8 and a directional light with direction ![]() and intensity 0.5.
and intensity 0.5.
There is one red curved triangle with vertices ![]() ,
, ![]() , and
, and ![]() .
.
There is one green sphere with center ![]() and radius
and radius ![]() .
.
For debugging your program, it is good to start with a very simple scene. This scene includes a single green sphere, a point light, and a white “ground” plane. By editing the settings line in the file you can turn on/off mirror reflections, shadows, specular, and diffuse lighting. You can also comment out the ss and ps lines to enable or disable the sphere or plane surfaces, respectively. Here is what you should expect your program to render in various cases (all of these images are 512x512 and took about 1–2s each to render using the solution code, but during debugging you might want to use a much smaller canvas size to reduce rendering time):


Follow the instructions on the assignments page.
For this assignment you will be graded based on both the visual output and the code corresponding to the following features:
An additional 10 points will be reserved for general aspects of your code, including correctness, documentation, organization, and efficiency.